I remember very well the first three branch flutes I’ve made. After that, only selective memory.
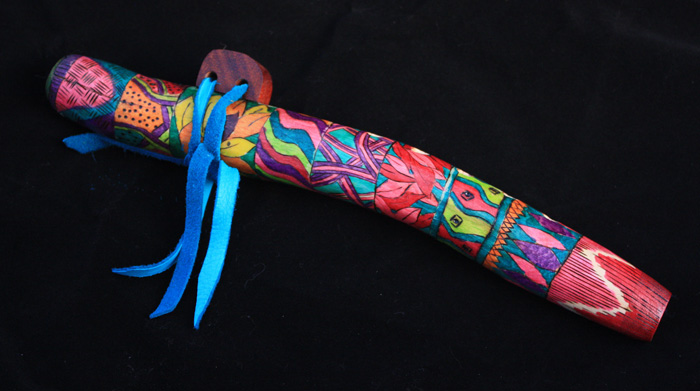
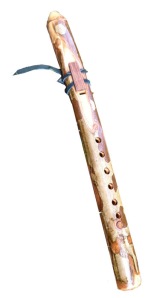 Sycamore Branch Flute
In Oct. 2010 I was out cycling and rode past a team cutting down three significant sycamore trees on the lawn of a local bank. I stopped and asked if I returned with my car could I have a few branches. With a trunk full of sycamore, I returned home and ordered a gouge and chisel from Woodcraft. I envisioned making several branch flutes.
 My gouge arrived from Woodcraft on a Saturday and Sunday afternoon, in the span of 3 hours, I carved out the sound chamber and slow air chamber on a large, green branch of sycamore. Never having used a gouge and mallet before, this was quite the task.
I worked with great zest to hollow the flute, sand it, shellac its inside and glue it together before the sun set.
Monday morning my arms were heavy and sore and I could barely lift them to place my hands to steer the car to work. Later that day, my shoulders were jelly and I could not lift my arms high enough to write on the chalkboard.
 Lessons Learned? Don’t set too short a time limit for carving a large flute. Do not dig deep into green wood when carving it out. And thirdly, choose a smaller branch!
The flute did have a beautiful crisp tone in the key of A.
Here’s a short clip played on the sycamore branch flute.
 The second branch flute made from a smaller branch in Feb. 2011, came from a neighbor pruning her crepe myrtle.
Crepe Myrtle Branch Flute
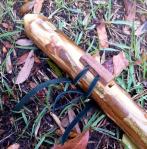
After using the bandsaw to split the branch (be sure to use an old blade to cut a green branch) I carved out the bore with chisel and gouge. The whole process took less than an hour and it was a delight especially after a full day of working on the computer. The wood was green and considerably easier to work with than I’d anticipated.
After putting two coats of shellac on the interior and prepping the SAC (slow air chamber) exit and true sound hole (TSH) from the inside, I glued two halves with Titebond III and clamped together.
However the problems with this flute came as the wood dried and moved. This caused the seams on the flute to split apart and also cracking (checking) in the wood itself. I sealed cracks with CA glue, and eventually the wood settled down.
But I would have to agree with the comment on a musical instrument forum that “the wood was too much work for too little yield either in sound or attractiveness of wood”. “Flyfsh” posted step-by-step directions with photos on PaleoPlanet and on his website claims he enjoys making crepe myrtle branch flutes.
You can hear how the crepe myrtle flute sounds in “Tribute to Crepe Myrtle”.
Lessons learned? When possible, let the branch dry considerably before halving it. I collect my branches, and then the ones I think I will use are taken into the house and put in a special box. Sometimes, I remove much of the bark and seal the ends. This lets me check for bugs, significant cracks, and rot. A branch with any of these will not make it to the special “Branch flute drying box.”
Dogwood Branch Flute
The third branch flute was shorter still and a choice piece of dogwood. It was dry and like butter to work with.
You can watch images of the flute from tree to branch to flute in the video (yes, it is the dogwood flute you hear playing in the video) or read the post where I generally list the steps in making a branch flute.
I have since made 7 or 8 more dogwood branch flutes and have set aside several branches to dry for more flutes. They are my choice of wood for branch flutes although I also have choke cherry branches, mulberry and chestnut set aside in the “drying box.”
Mulberry Branch Flute
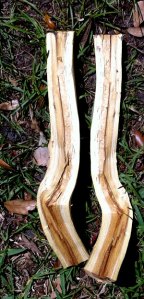
Two mulberry branch flutes are in the works. One of the mulberry flutes, I split with a hatchet and it split readily. Since it has a twist in the branch and is a bit of an “L” shape, this would have been more tricky to cut in half on the band saw. The wood was dry and I exploited a natural crack.
The thing about mulberry is it is very hard. However, if you check the Janka scale for hardness, dogwood is also a very hard wood and yet it is a charm to work with.
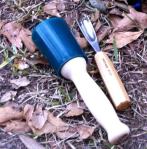
Knowing I would make many more branch flutes, I purchased an electric chisel. It is yet another learning curve.
I expected using electricity might make the chiseling process go more quickly and fluidly. This is perhaps true, however the vibration from holding the tool for too long a time requires a good hand and arm massage afterward.
As you make more branch flutes, you may come to love the unique challenge of looking at every branch to assess the surprises and delights it may bring. You look at branches and start strategizing as to the best way to hold the branch, where exactly the bird/fetish would best be placed and, based on the length and thickness of the branch, what key the flute might be in.
Leaving walls too thick on the branch means more work if you are trying to get the flute to have a recognizable scale. Usually the holes need to be undercut when the walls are too thick, and if the wood is hard, this can be quite the exercise. I do not burn any of the holes in my flutes. Burning can produce unexpected (always) and horrid smells that can forever turn me away from a flute.
Scales on the flutes can also be surprising. I do have some branch flutes that do not have a diatonic or pentatonic scale. They are just the scale that evolved based on the length, thickness and shape of the branch. This, too, can be highly instructive and inventive, if you like to play with the notes that nature gives you.
But I had to learn about taking the notes that the branch gives you from one of my failures. I had a small crepe myrtle branch flute that had only five holes drilled. But they were not the pentatonic scale I strove for, so I kept working the holes larger and larger until the flute made no sound at all. By then, of course, it didn’t look so good either!
My most recent (Dec. 2013) dogwood branch flute has a beautiful tone. But it was very white (as dogwood is when its bark is removed) and plain. I spent some time with my woodburning pen. The result? A lively looking and sounding branch flute.

Well, I have various sizes mostly “V” gouges. I’d have to look up the sizes that I use the most, but right now my gouges and I are not together so it will be a bit before I can let you know. Good question though because I think that was my first question too – which size should I buy first! 🙂
LikeLike
Great stuff here! May I ask what type of gouge you use? I’ve experimented with fishtail, etc. just curious to know what type you prefer. Thanks!
LikeLike